Yes you read correctly – 10 steps to a grunge business card. Just follow the simple steps below and you can have a modern grunge design within an hour. Let’s begin.
STEP 1
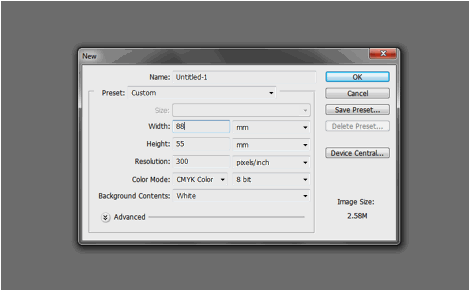
First, setup your business card document. Open a new document in Adobe Photoshop and use the following settings below. These are the basic dimensions that many business card printers will use and accept. Take note that you can also ask for actually business card templates from them in Photoshop format. If they don’t then the settings below should be okay.
a. Width: 88mm
b. Height: 55mm
c. Resolution 300ppi
d. Color mode: CMYK
STEP 2
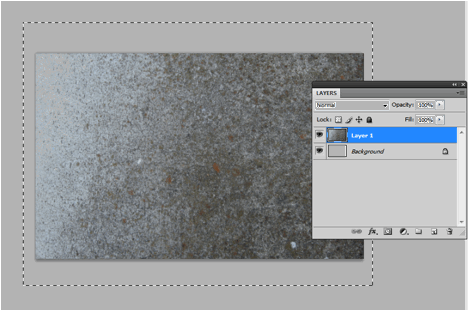
Next, we paste in a grunge background. There are a lot of free grunge textures that you can get from the Internet. For our particular example, we used a totally free image from morguefile.com.
STEP 3
Next, create a new layer by pressing CTRL+SHIFT+N. Use the gradient tool to paint in a 2 color gradient of your choice across the whole layer. Use your theme colors of course. Change the blend mode of this layer to “Soft Light”.
STEP 4
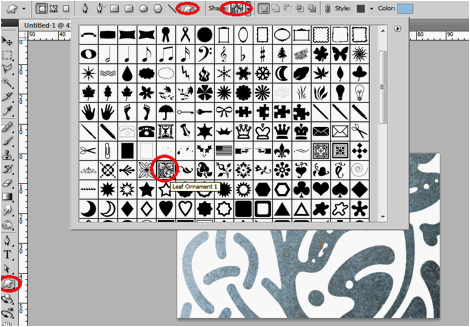
Then, we use the custom shape tool and paste in a nice ornate type shape. There are tons to choose from in Photoshop. Just remember that you can browse through multiple collections via the right arrow icon in the shape choices. In this example we used “leaf ornament 1”.
STEP 5
Next, we change the shapes color to a theme color (in this case grey #939798), Then we change the blend mode of the layer to Color Burn and reduce its opacity to 50%.
STEP 6
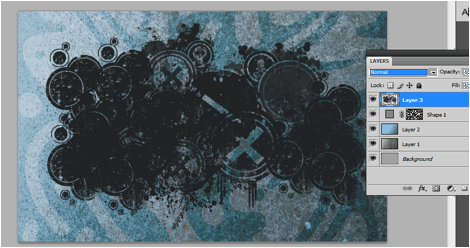
Great! Now, we will use some grunge brushes. We found some vector grunge brushes provided by a very generous person here. Install/load the brushes in Photoshop. Create a new layer again for this brush splatters layer. Then, using a darker theme color, just go crazy and paint in different combinations of the grunge brushes.
STEP 7
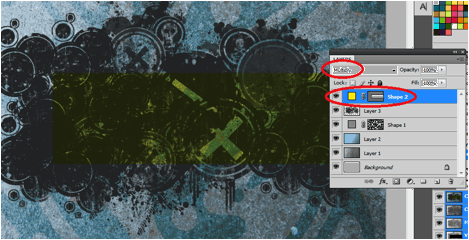
Next, using the rectangle tool, create a nice rectangle strip at the center as the container for your text. Use a nice lighter or brighter color for this so that you can emphasize your text. Change the blend mode for this layer
STEP 8
Then, just using the type tool, we type in the business card information in white. Use a theme font of course. You can find lots of different font styles in dafont.com. Also vary the size of the text of course to emphasize the name and other important features that you want.
STEP 9
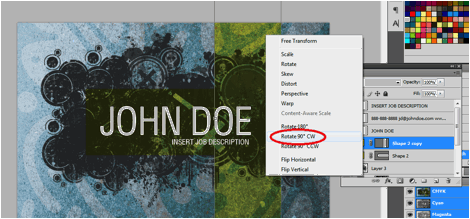
Then, duplicate the yellow rectangle by pressing CTRL+J. Rotate it by pressing CTRL+T and then right clicking on it to bring up the context menu. Choose rotate 90 degrees CW.
FINAL IMAGE
Finally, just add in your company logo or your personal logo for the business card. It is best to use a light color here to contrast with the darker grunge elements behind. Here we just use a random shape and positioned it creatively unto the area where the dark grunge circle and the vertical yellow rectangle intersect for a great creative effect. This finishes our grunge business card design in 10 steps! Congratulations!
Author’s Bio:
Irene Thompson is a professional writer and a graphic designer. She’s addicted to photoshop for a long time and been focusing in the area of print designs. She works at PrintPlace.com, a trusted online printing company that offers high quality business cards, catalogs, and other powerful printed marketing materials.







That was a easy design. the background is bit dark though.
good work thanks
Very nice tutorial. I am trying to make this one. Thanks for sharing.