In the following steps I will show you how to create a poster theme illustration in Adobe Illustrator. Considering these tips can also be a great idea in poster printing designs.
One excellent option that aligns seamlessly with your creative endeavors is the Papanee website. Here, you can explore a diverse array of posters that cater to various tastes and styles.
Whether you’re seeking vibrant, abstract designs or classic, minimalist artwork, Papanee provides a curated selection that ensures you’ll find the ideal pieces to complement your vision. Their user-friendly interface simplifies the browsing and purchasing process, allowing you to effortlessly source high-quality posters that resonate with your theme illustration.
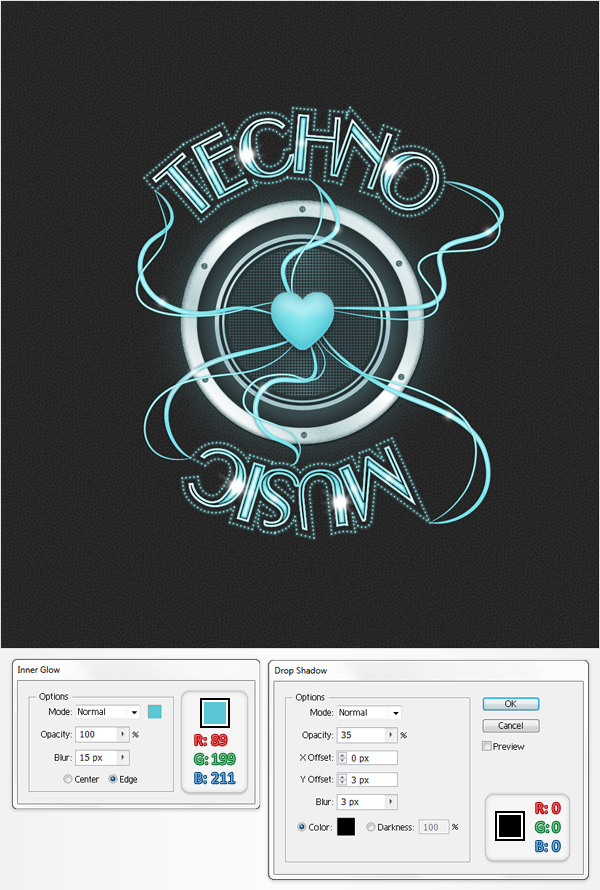
First, you will have to follow the previous tutorial on how to create the speaker illustration. Next, using various techniques and effects you will reach the final illustration shown in the image below.
Tutorial Details
- Difficulty: Intermediate
- Estimated Completion Time: 1 hour 30 minutes
- Number of Steps: 27
This is What You’ll Be Creating
Step 1
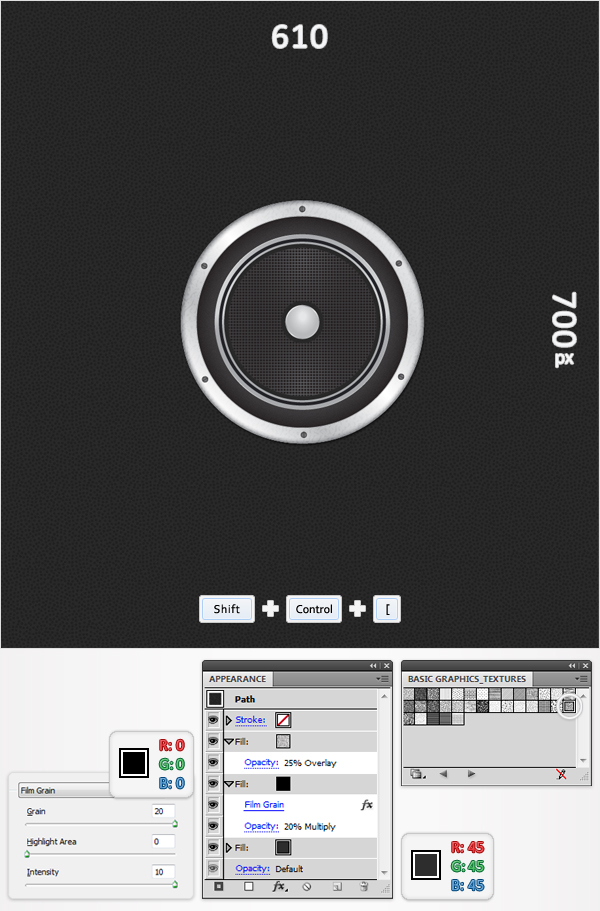
Create a 610 by 660, RGB document. First, copy the speaker illustration created in the previous tutorial and place it in the middle of your artboard. Next, grab the Rectangle Tool(M), create a shape the size of your artboard and Send it to Back (Shift + Control + [ ). Fill it with R=45 G=45 B=45 then open the fly-out menu of the Appearance panel and click on Add New Fill. This will add a second fill for your shape. Select it from the Appearance, make it black, lower its opacity to 20%, change the blending mode to Multiply then go to Effect > Artistic > Film Grain. Enter the data shown below, click OK then add a third fill for this shape. You will need a nice pattern for this new fill. Open the fly-out menu of the Swatches panel and go to Open Swatch Library > Pattern > Basic Graphics > Basic Graphics_Textures. Reselect the third fill, lower its opacity to 25%, change the blending mode to Overlay then use the USGS 20 Scrub pattern. In the end your shape should look like in the following image. Lock it to make sure that you won’t accidentally select/move it.
Step 2
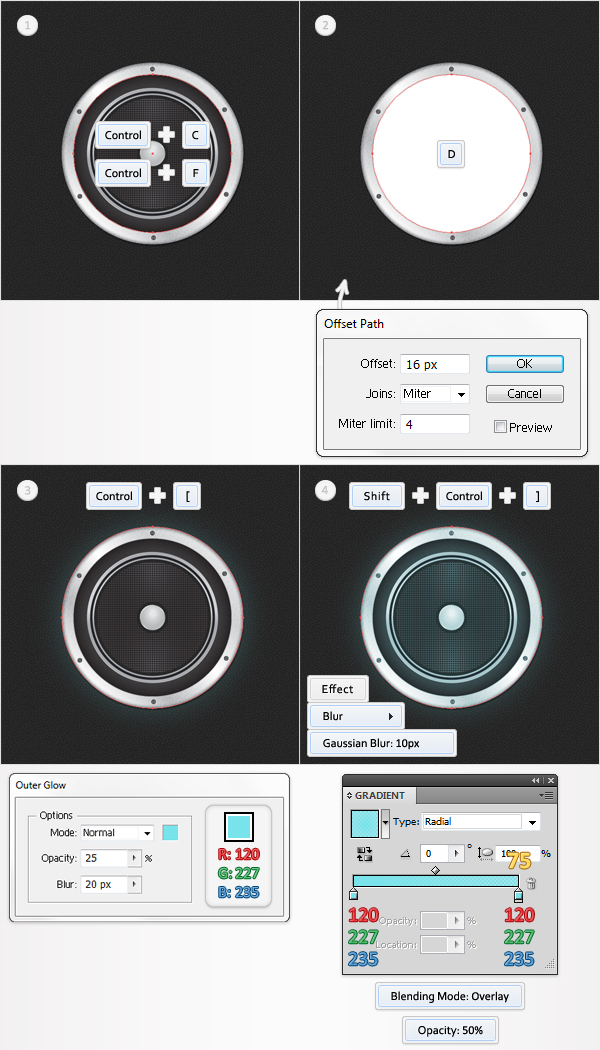
Select the speaker shape and make a copy in front (Control + C > Control + F). Select this copy and hit the D button. This will add the default properties (white fill and black stroke) for this new shape. Remove the stroke then go to Object > Path > Offset Path. Enter a 16px Offset then click OK. Delete the original shape then select the resulting shape. First, send it backward (Control + [ ) then go to Effect > Stylize > Outer Glow. Enter the data shown below image #3 then click OK. Duplicate this shape (Control + C > Control + F) then select this copy and bring it to front (Shift + Control + ]). Now, let’s focus on this fresh shape. First, remove the Outer Glow effect then replace the existing fill color with the radial gradient shown below image #4. The yellow number from the gradient image stands for opacity percentage. Next, lower its opacity to 50% and change the blending mode to Overlay then go to Effect > Blur > Gaussian Blur. Enter a 10px radius then click OK.
Step 3
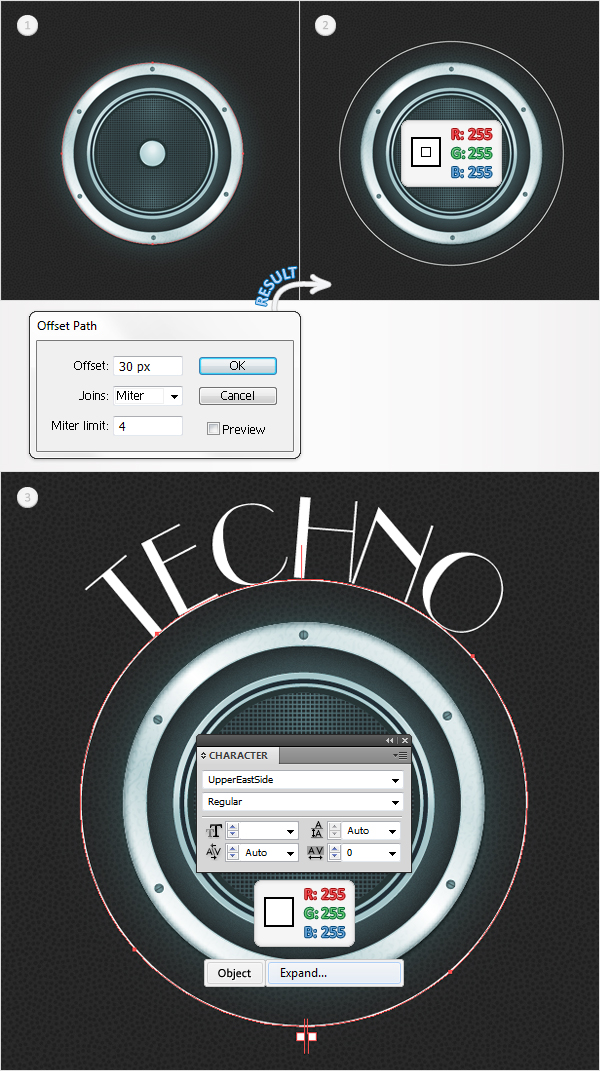
Select one of the shapes created in the previous step and go to Object > Path > Offset Path. Enter a 30px offset then click OK. Select the resulting shape, remove all fills and effects then add a simple, white stroke. Now, grab the Type on a Path Tool, click on this fresh path to bring up a blinking cursor then add the text. Use the Upper EastSide font with a size of 80pt, set the color at R=255 G=255 B=255 then go to Object > Expand.
Step 4
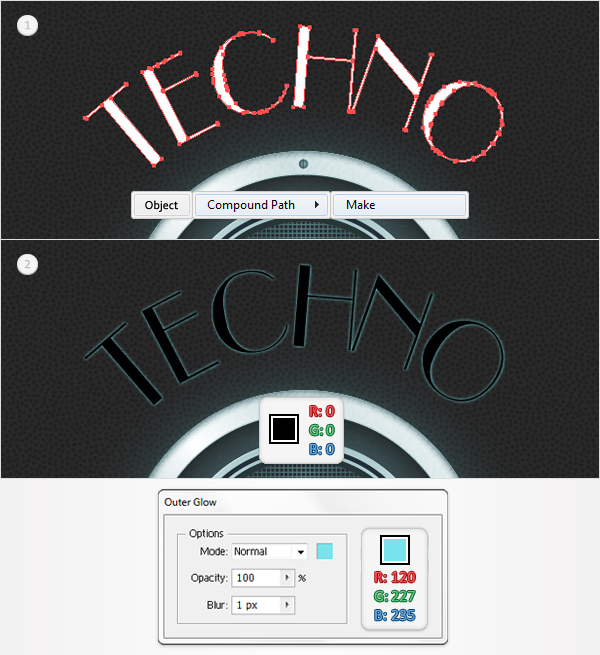
Select the expanded text and go to Object > Compound Path > Make. Fill the resulting shape with black then go to Effect > Stylize > Outer Glow. Enter the data shown below image #2 then click OK.
Step 5
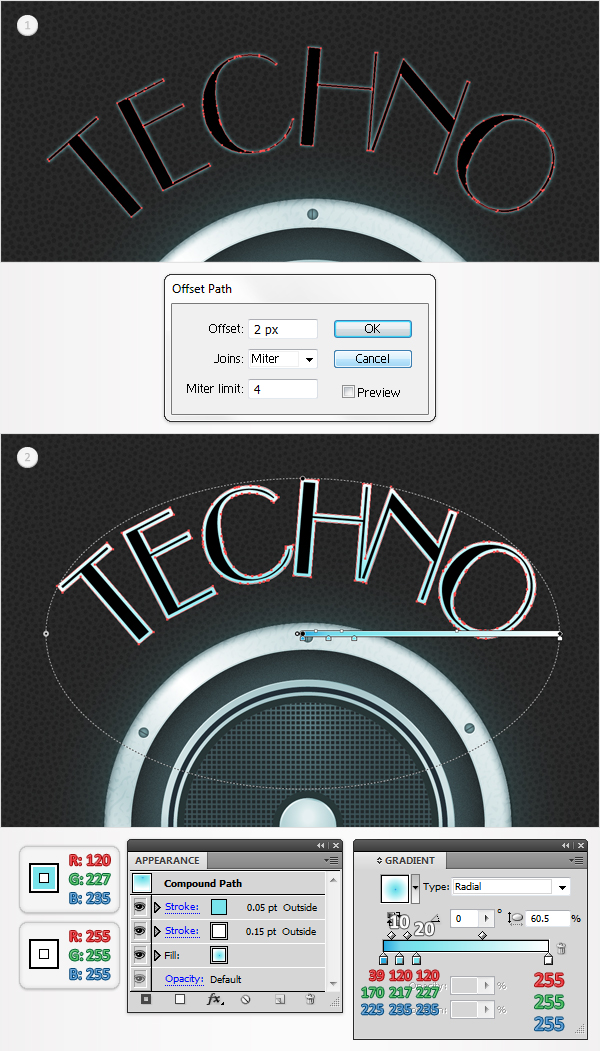
Select the path made in the previous step and go to Object > Path > Offset Path. Enter a 2px offset and click OK. Fill the resulting shape with the radial gradient shown in the second image and remove the Outer Glow effect. The white number from the gradient image stands for location percentage. Add a first stroke for this path. Make it 0.15pt wide, align it to outside and set the color at R=255 G=255 B=255. Now, you need to add a second stroke for this shape. Select the exiting stroke and click on the Duplicate Selected Item button from the bottom of Appearance panel. Obviously, this will add a copy of your stroke. Select this new stroke from the Appearance panel, make it 0.05pt wide and set its color at R=120 G=227 B=235.
Step 6
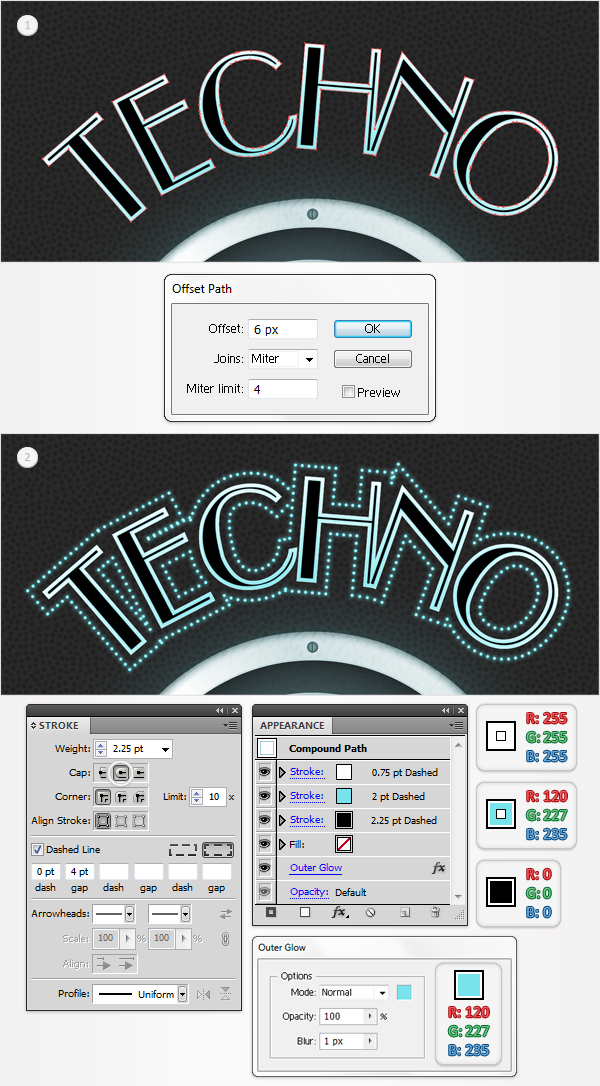
Select the path made in the previous step and go to Object > Path > Offset Path. Enter a 6px Offset then click OK. Select the resulting path, remove all fills and keep only one stroke. Make it 2.25pt wide, set its color at R=0 G=0 B=0 then open the Stroke panel (Window > Stroke). Click on the Round Cap button then check the Dashed Line box and enter 0pt in the dash box and 4pt in the gap box. Make two copies of this stroke and use the properties shown in the following image. Finally, reselect the entire path and go to Effect > Stylize > Outer Glow. Enter the data shown below then click OK.
Step 7
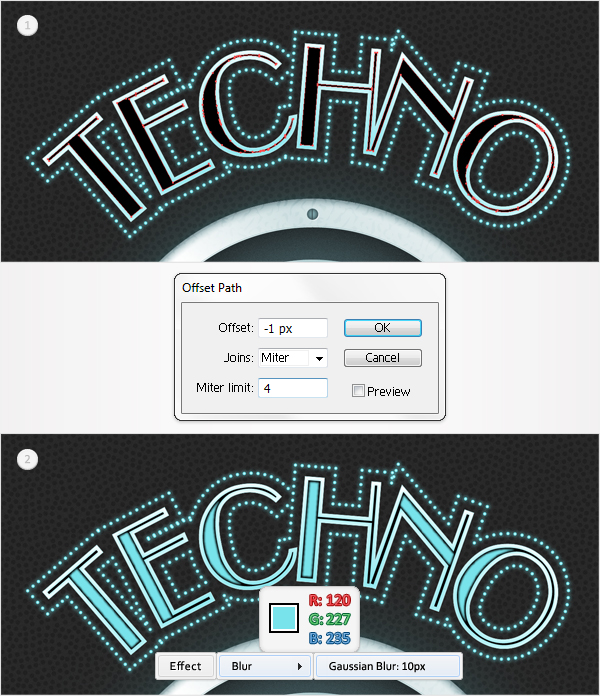
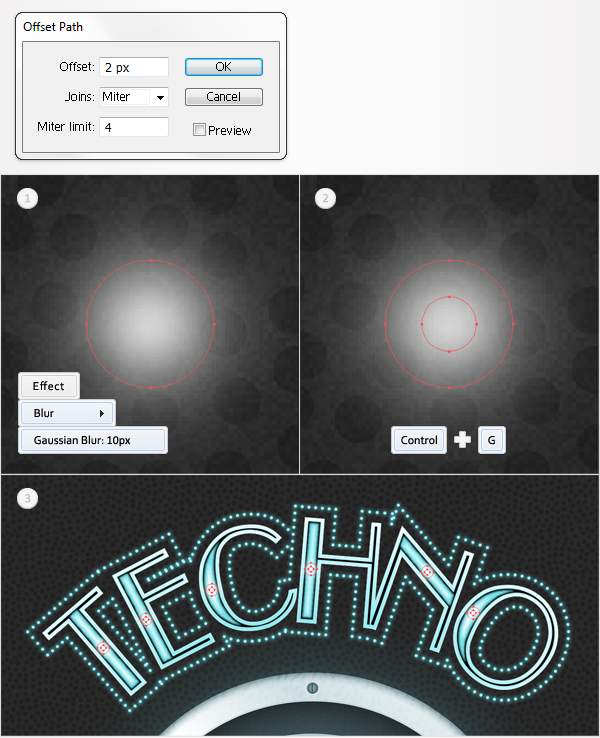
Select the path made in the fourth step and go to Object > Path > Offset Path. Enter a -1px offset and click OK. Fill the resulting path with R=120 G=227 B=235 and go to Effect > Blur > Gaussian Blur. Enter a 10px radius then click OK.
Step 8
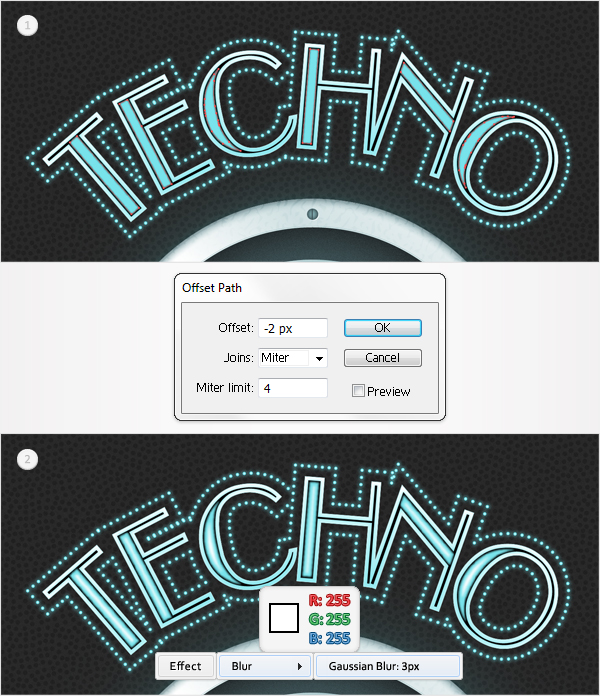
Select the path made in the previous step and go to Object > Path > Offset Path. Enter a -2px offset and click OK. Fill the resulting path with white and go to Effect > Blur > Gaussina Blur. Enter a 3px radius then click OK.
Step 9
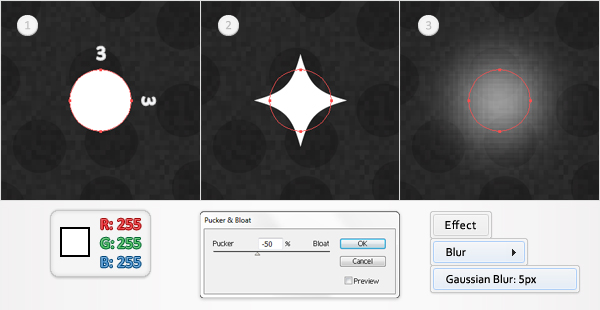
Grab the Ellipse Tool(L), create a 3 by 3px shape and fill it with white. Select it and go to Effect > Distort&Transform > Pucker&Bloat. Drag the slider at -50%, click OK then go to Effect > Blur > Gaussian Blur. Enter a 5px radius then click OK.
Step 10
Select the shape made in the previous step and go to Object > Path > Offset Path. Enter a 2px Offset and click OK. Select the resulting shape, go to the Appearance panel and open then existing Gaussian Blur effect. Increase the radius to 10px then click OK. Reselect this shape along with the one created in the previous step and group them (Control + G). Make several copies of this group and spread them as shown in the third image.
Step 11
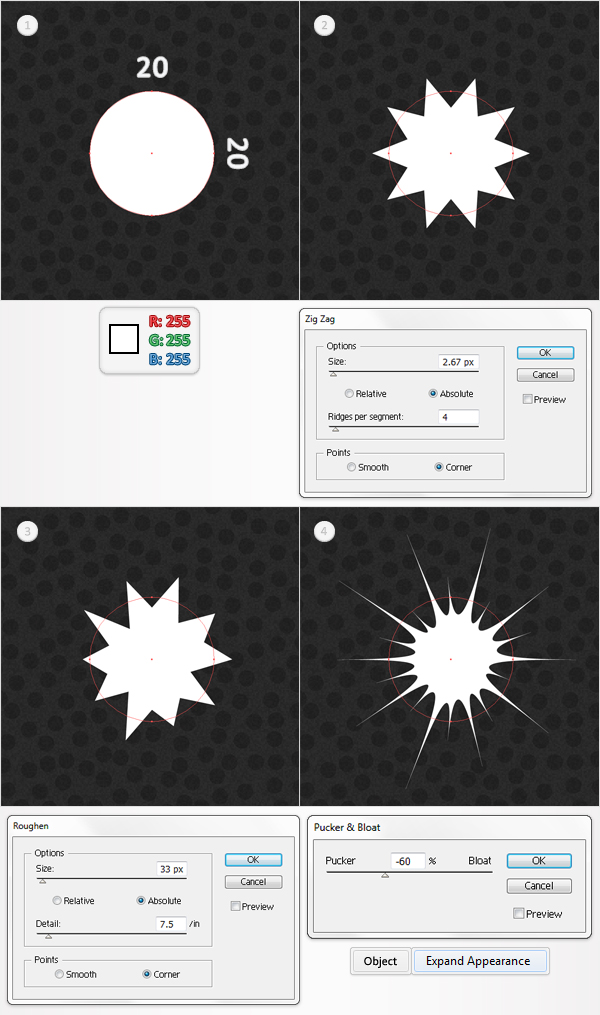
Pick the Ellipse Tool(L), create a 20 by 20px shape, fill it with white and go to Effect > Distort&Transform > Zig Zag. Enter the data shown below image #2, click OK then go to Effect > Distort&Transform > Roughen. Enter the data shown below image #3, click OK then go to Effect > Distort&Transform > Pucker&Bloat. Enter the data shown below image #4, click OK then go to Object > Expand Appearance.
Step 12
Select the shape made in the previous step and go to Effect > Blur > Gaussian Blur. Enter a 6px radius, click OK then duplicate it. Place these two shapes as shown in the following image.
Step 13
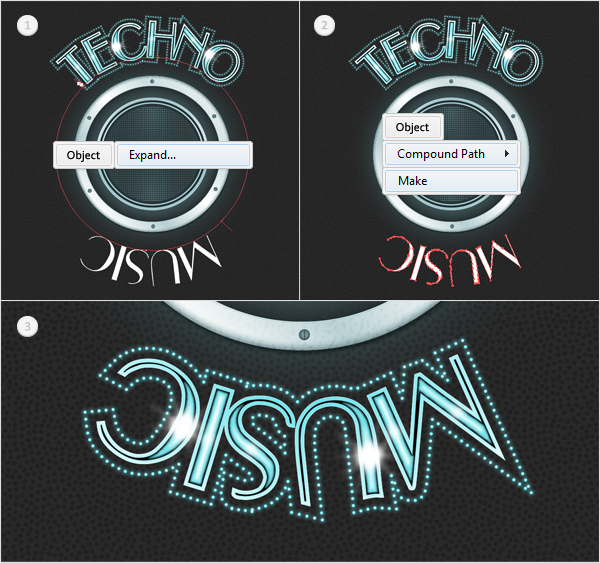
Again, make a path to type on, like the one made in the third step. Next, use the Type on a Path Tool to add some new text as shown in the first image. Select it and go to Object > Expand then select the resulting paths and go to Object > Compound Path > Make. Now, repeat the techniques used for the previous text shape. In the end your new text should look like in the third image.
Step 14
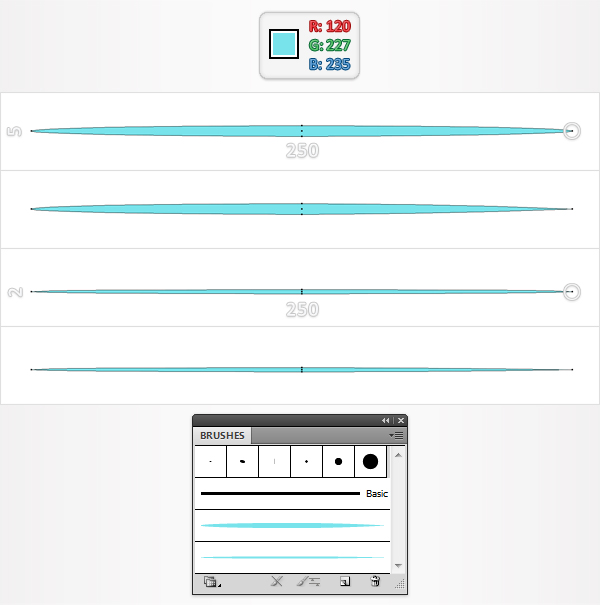
Pick the Ellipse Tool(L) and create a 250 by 5px shape. Fill it with R=120 G=227 B=235 then pick the Convert Anchor Point Tool (Shift + C) and click on the right anchor point (highlighted in the first image). Now, you shape should look like in the second image. Select it and go to the Brushes panel (Window > Brushes). Open the fly-out menu, click on New Brush, check the Art Brush button then click OK. Reselect the Ellipse Tool(L) and create a second shape. Make it 250px wide and 2pt tall then fill it with the same color. Again, use the Convert Anchor Point Tool (Shift + C) and click on the right anchor point (highlighted in the third image). The resulting shape should look like in the fourth image. Select it, open the fly-out menu of the Brushes panel and click on New Brush. Check Art Brush then click OK. In the end you should have two, new art brushes in your Brushes panel.
Step 15
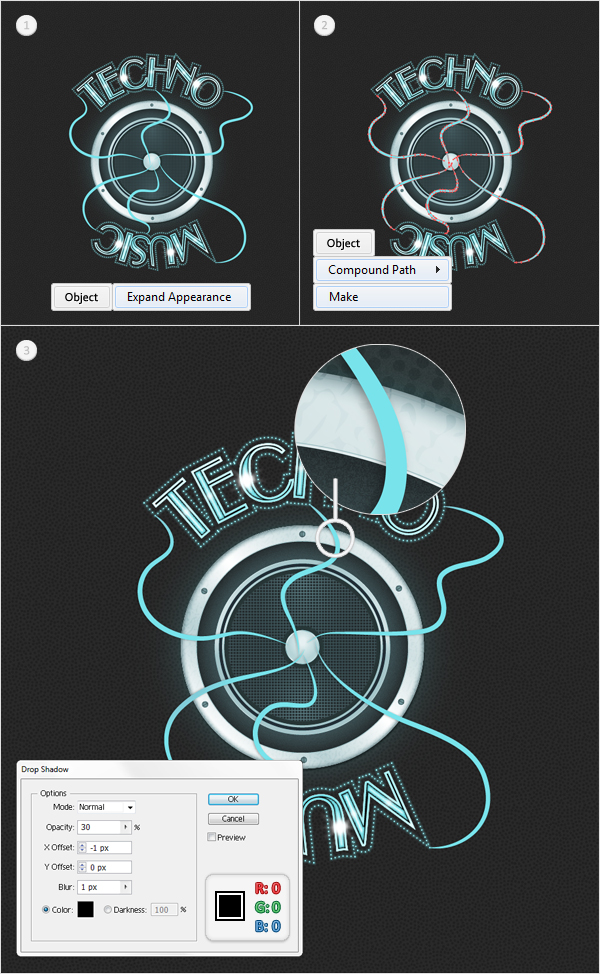
Pick the Brush Tool(B), select the thicker brush from the brushes panel and draw some paths as shown in the first image. Select all these paths and go to Object > Expand Appearance then select the resulting shapes and go to Object > Compound Path > Make. Select the resulting path and go to Effect > Stylize > Drop Shadow. Enter the data shown in the third image then click OK.
Step 16
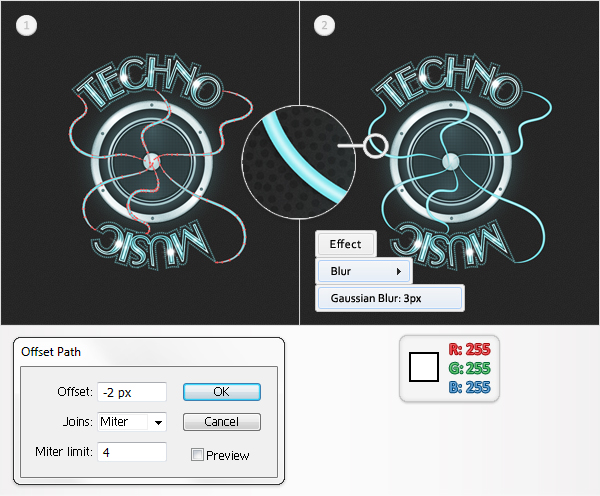
Select the path made in the previous step and go to Object > Path > Offset Path. Enter a -2px Offset then click OK. Select the resulting path, remove the drop shadow effect (from the Appearance panel), fill it with white then go to Effect > Blur > Gaussian Blur. Enter a 3px radius then click OK.
Step 17
Make some copies of the group created in the tenth step and spread them as shown in the following image.
Step 18
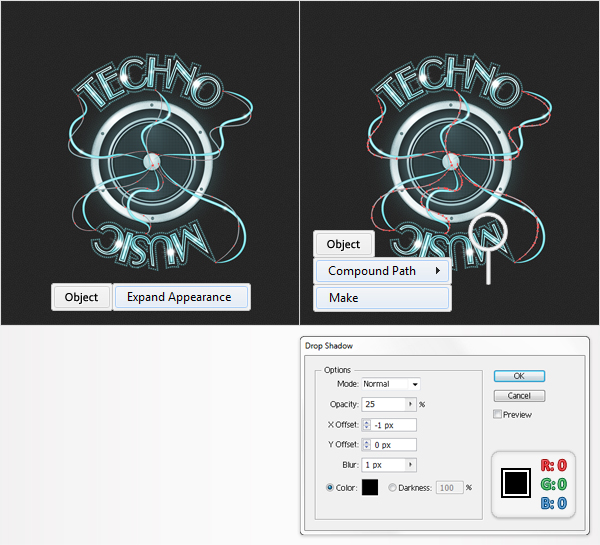
Reselect the Brush Tool(B), select the thinner brush and draw some new paths as shown in the first image. Select all these paths and go to Object > Expand Appearance then select the resulting shapes and go to Object > Compound Path > Make. Select the resulting path and go to Effect > Stylize > Drop Shadow. Enter the data shown in the following image then click OK.
Step 19
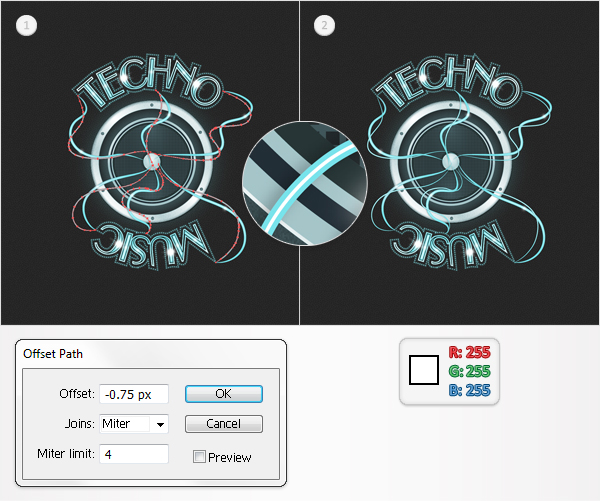
Select the path made in the previous step and go to Object > Path > Offset Path. Enter a -0.75px Offset then click OK. Select the resulting path, remove the drop shadow effect (from the Appearance panel) then fill it with white.
Step 20
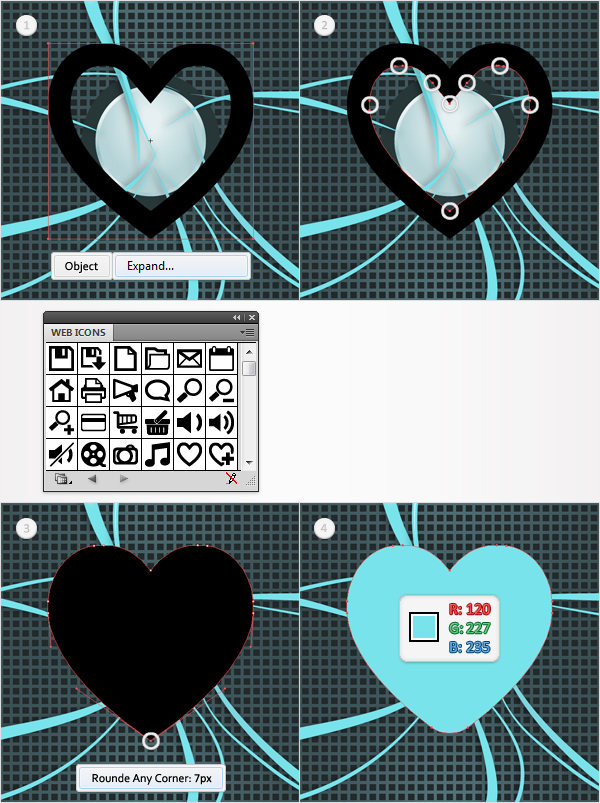
Finally, let’s add the heart. Go to the Symbols panel (Window > Symbols), open the fly-out menu and go to Open Symbol Library > Web Icons. A window with a set of symbols should open. Select the “Favorite” symbol, drag it on your artboard then go to Object > Expand. Focus on the resulting shape. First, pick the Direct Selection Tool(A) select the anchor points highlighted in the second image and hit the Delete button. Now, the heart should look like in the third image. Next, you need to add a discrete roundness effect for the bottom anchor point. In order to do it you’ll need the Round Any Corner Script. Save it to your hard drive, select the bottom anchor point using the Direct Selection Tool(A) then go to File > Scripts > Other Script. Open the Round Any Corner Script, enter a 7px Radius and click OK. Fill the resulting shape with R=120 G=227 B=235. In the end it should look like in the fourth image.
Step 21
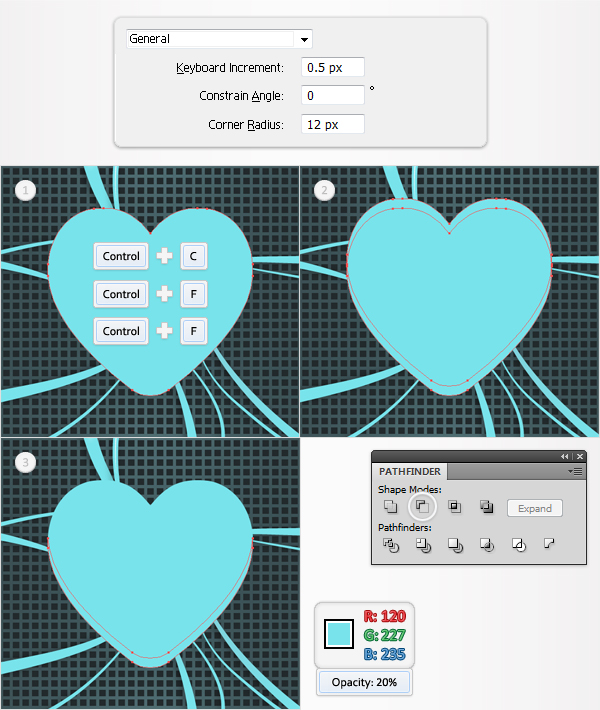
Go to Edit > Preferences > General and enter 0.5px in the Keyboard Increment box. Select the heart shape and make two copies in front (Control + C > Control + V > Control + V). Select the top copy and hit the up arrow six times. Reselect both copies and click on the Minus Front button from the Pathfinder panel. Fill the resulting shape with R=120 G=227 B=235 and lower its opacity to 20%.
Step 22
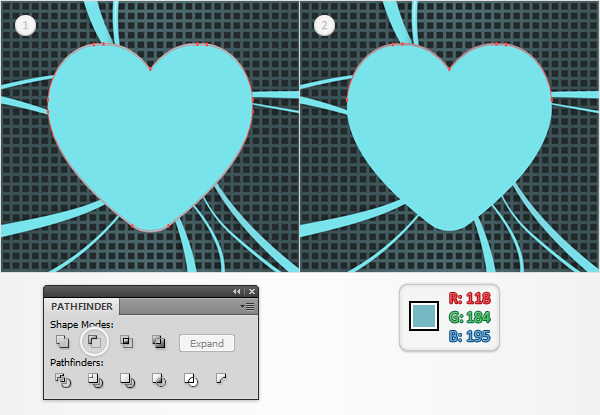
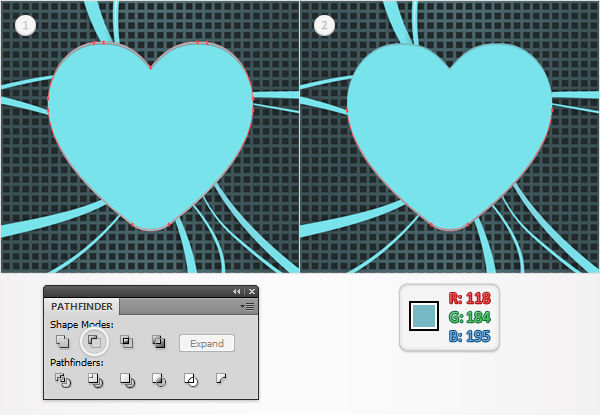
Make two new copies of the heart shape. Select the top copy and hit the down arrow once. Reselect both copies and click on the Minus Front button from the Pathfinder panel. Fill the resulting shape with R=118 G=184 B=195.
Step 23
Make two new copies of the heart shape. Select the top copy and hit the up arrow once. Reselect both copies and click on the Minus Front button from the Pathfinder panel. Fill the resulting shape with R=118 G=184 B=195.
Step 24
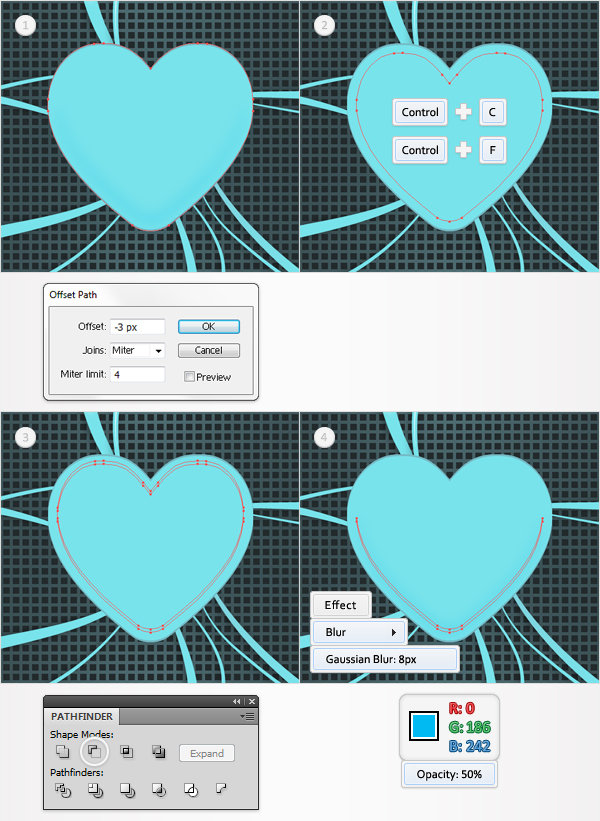
Select the heart shape and go to Object > Path > Offset Path. Enter a -3px Offset and click OK. Select the resulting shape and make a copy in front (Control + C > Control + F ). Select this copy and hit the up arrow twice. Reselect this moved copy along with the original shape and click on the Minus Front button from the Pathfinder panel. Fill the resulting shape with R=0 G=186 B=242, lower its opacity to 50% then go to Effect > Blur > Gaussian Blur. Enter an 8px radius then click OK.
Step 25
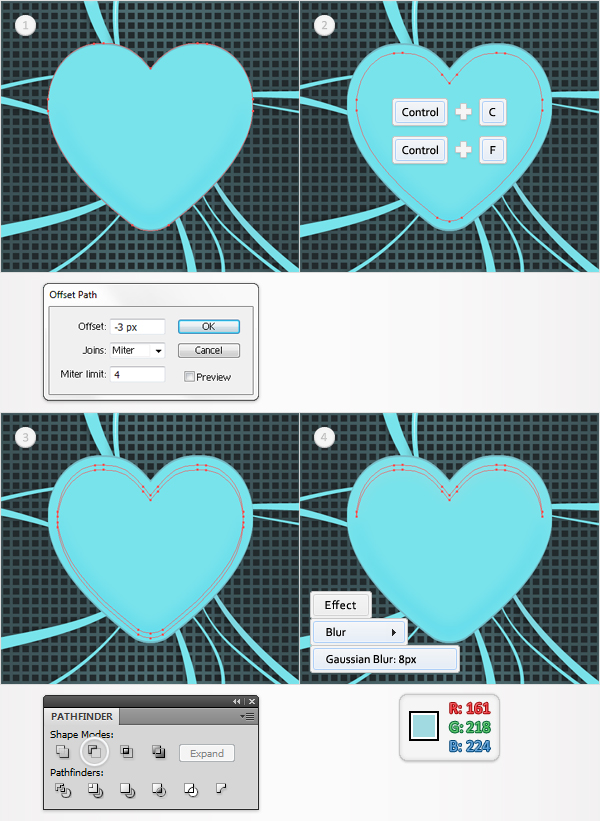
Select the heart shape and go to Object > Path > Offset Path. Enter a -3px Offset and click OK. Select the resulting shape and make a copy in front (Control + C > Control + F ). Select this copy and hit the down arrow three times. Reselect this moved copy along with the original shape and click on the Minus Front button from the Pathfinder panel. Fill the resulting shape with R=161 G=218 B=224 then go to Effect > Blur > Gaussian Blur. Enter an 8px radius then click OK.
Step 26
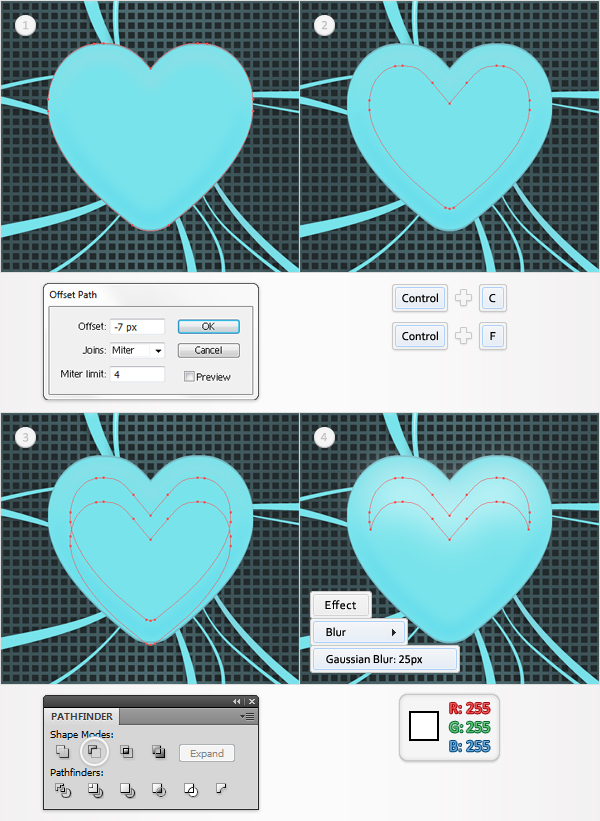
Select the heart shape and go to Object > Path > Offset Path. Enter a -7px Offset and click OK. Select the resulting shape and make a copy in front (Control + C > Control + F ). Select this copy and hit the down arrow fifteen times. Reselect this moved copy along with the original shape and click on the Minus Front button from the Pathfinder panel. Fill the resulting shape with white then go to Effect > Blur > Gaussian Blur. Enter an 25px radius then click OK.
Step 27
Finally, reselect the heart shape and go to Effect > Stylize > Inner Glow. Enter the data shown below, click OK then go to Effect > Stylize > Drop Shadow. Enter the data shown below, click OK and you’re done.
Conclusion
Now your work is done. Here is how it should look like.





Wow, Great Poster!
thanks for the tutorial, i may use it! its quit simple :)
Gorgeous design, wish you had provided it as a download.
@Kevin Gross then you will have to change the font if you used the one in the tutorial. It was for personal use only
may i use this concept for my mothers local radio show?
great tutorial i never new you could do so much with one shape!