


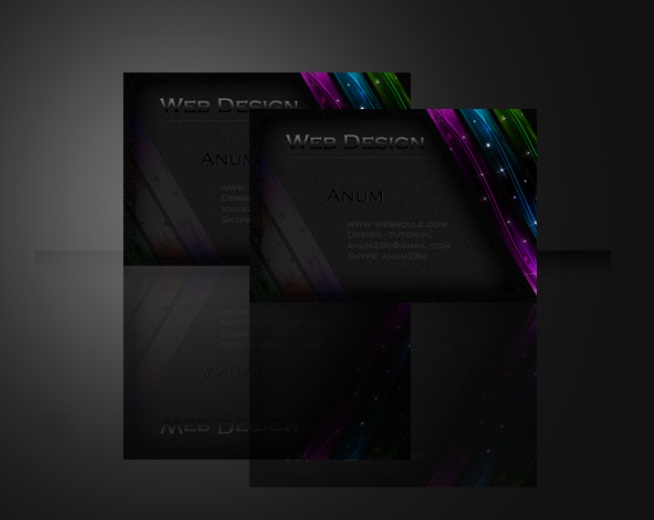
Hi guys, I’m quite excited about this tutorial, hope you guys enjoy it too. In this tutorial we’ll create a sleek business card using our very own Photoshop. We’ll be using some simple techniques to get an awesome result. So before we start let’s have a look at our final result:-
Step 1:-
Open your Photoshop and create a new file with 700px width and 500px height.

Step 2:-
Now select the “Paint bucket tool” and fill the background with # 000000.

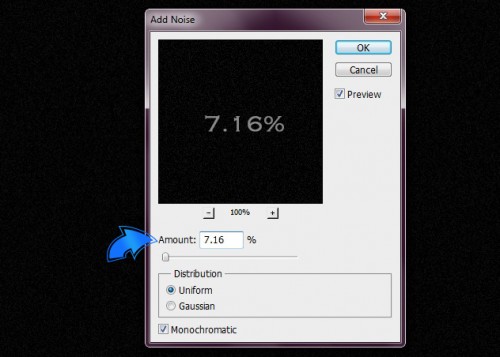
Step 3:-
Now we’ll add some noise to our background, so for this click on Filter> Noise> Add noise. And keep the noise amount 7.16%.
Step 4:-
Make sure you create a new layer for each step from now on, so to create a new layer click on Layer> New> Layer. Now we are going to start with nice colorful strips on the right side of our card. So for this click on “Polygonal lasso tool” and select a tilted rectangle on the right.

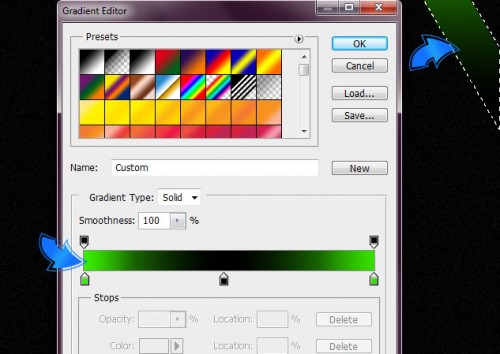
Step 5:-
Now we’ll add a nice gradient to the rectangle. I’ve used a bright green one with outer color stop of # 35e200 and middle one should be # 000000.
Step 6:-
Select the “Hard round brush” with 2px size and # 35e200 color. Now select the “Pen Tool” and create 2 lines then right click on the path and select stroke path.

Step 7:-
Now again select the “Pen Tool” and click on “Shape layers”. Make sure your foreground color is # ffffff. Then create a shape on the strip.

Step 8:-
We need to change the blending mode of the shape we’ve created above. For this click on Layer> Layer style> Blending Options. Then change the blending mode to “Soft Light”.

Step 9:-
Now we’ll add some stars randomly to our strip with our foreground color # ffffff.

Step 10:-
Now repeat the same process and create another strip, this time we’ll use a blue gradient. With outer color stops # 00d7fd and middle one should be # 000000.

Step 11:-
Simply repeat the same process and decorate the second strip.

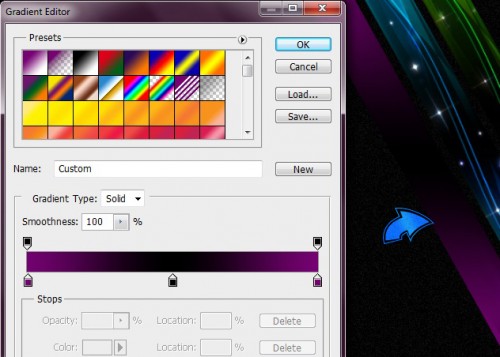
Step 12:-
For the third layer use a purple gradient. With outer color stops # 770273 and middle one should be # 000000.
Step 13:-
Again add all the design details as we have done before.

Step 14:-
Now once again select the “Pen Tool” and create a nice shape then right click on the path and click on “Make selection”. Now fill it with # 898989 using “Paint bucket Tool”. Then change the blending mode of the above layer to “Hard light”. Now click on Layer> Layer style> Inner glow. And add a inner glow with color # 000000, 80px size and 100% opacity. Make sure your inner glow blending mode is changed to “Soft light”.

Step 15:-
First group the 3 strips and then duplicate the strips by right clicking on the group and select “duplicate group”. Now change the blending mode of the duplicate group to “Divide”.

Step 16:-
Now select the “Text Tool” and add tittle of our card. Then your name and other contact details. I’ve used a simple black and white gradient for the tittle. And other text with color #2e2e2e.

Step 17:-
Now select the “Hard round brush” with 1px size and color # 000000. Then create a straight line under our tittle. Then repeat the same process but this time change the color to # 898989 and create another line under the first one. Now reduce the opacity of these lines to 20%. Now we have a nice groove effect. Use can use it again simply duplicate the layer.

And now we are done. Our sleek business card is ready. I hope you guys enjoyed the tutorial and learned something new. I’ll be back with more exciting tutorials till then take care.


72 dpi and RGB color are both not appropriate for color printing.
You would want to set it to CMYK at least 300 dpi and leave an extra 1/8″ all around for full bleed printing.
If this is not designed to print then you’re fine but I’m not sure that I would understand a non printed business card.
Good call.
Excellent point buddy, I wonder how I miss that. As I usually select a “U.S. Paper” sized document. That’s 8.5”x 11” at 300 dpi. And color mode: CMYK Color. Anyways, I’ll change the settings. Thanks
… Hi,
Thanks for sharing the BIGGEST deadly sin ever .., designing a buzzcard in PHOTOSHOP (no bleed, no CMYK, no 300dpi)? Dsjesus, guys, get real will you!
For buzzcards, logo’s and other stuff ONLY use vector-based software (e.g. Illustrator), .. don’t be an amateur!
Hi,
Get your facts straight buddy, I was asked to use photoshop for this. Thanks
Also, no-one has mentioned that you’ve made the document 700 x 500 px, which is neither the right units to use or the correct size/ proportions for a business card.
Cards should be 85 or 90mm x 55mm. Or there about. Or however that converts to inches for Americans.
So, nice effect, but you REALLY shouldn’t be trying to get people to follow a tutorial on how to create artwork for print that is so badly wrong. No wonder so many people have no idea why their artwork is not print ready these days.
Hi, I appreciate that you were asked to supply this in a Photoshop tutorial but NHO designer would make business cards for a client totally in Photoshop, maybe some effects to bring into Illy / Indesign but never a total job. Also, yes, people have mentioned the size, resolution and colour settings but you haven’t mentioned anything about outlining fonts, ink limits and other considerations for commercial printing.
Sorry not meaning to be totally negative, some of the effects / looks are good :)